-
Spring Security OIDC,JWT : 모바일/웹 연동 (2)Project/TravelFeelDog 2023. 10. 18. 12:21
이전 글입니다.
https://chosunghyun18.tistory.com/177
Spring Security OAuth2 ,JWT : 모바일/웹 연동 (1)
이글은 Firebase 에서 OAuth2 , JWT 전환기(4) 에서 이어지는 글 입니다. https://chosunghyun18.tistory.com/176 Firebase 에서 OAuth2 , JWT 전환기(4) : 예외처리 지금까지 FireBase 를 사용한 시나리오에서 OAuth2 , JWT를 사
chosunghyun18.tistory.com
특정 url 을 통해 구글 로그인 페이지를 열고 로그인 하여 url 의 jwt 토큰을 받는 것을 만들었습니다.
이번에는 안드로이드 어플리케이션을 통하여 확인 하겠습니다.
로그인시 시퀀스 다이어그램은 다음과 같습니다.
하단의 그림은 OAuth2.0 기반에 SAML 의 특성을 더한 OIDC 다이어그램이다.
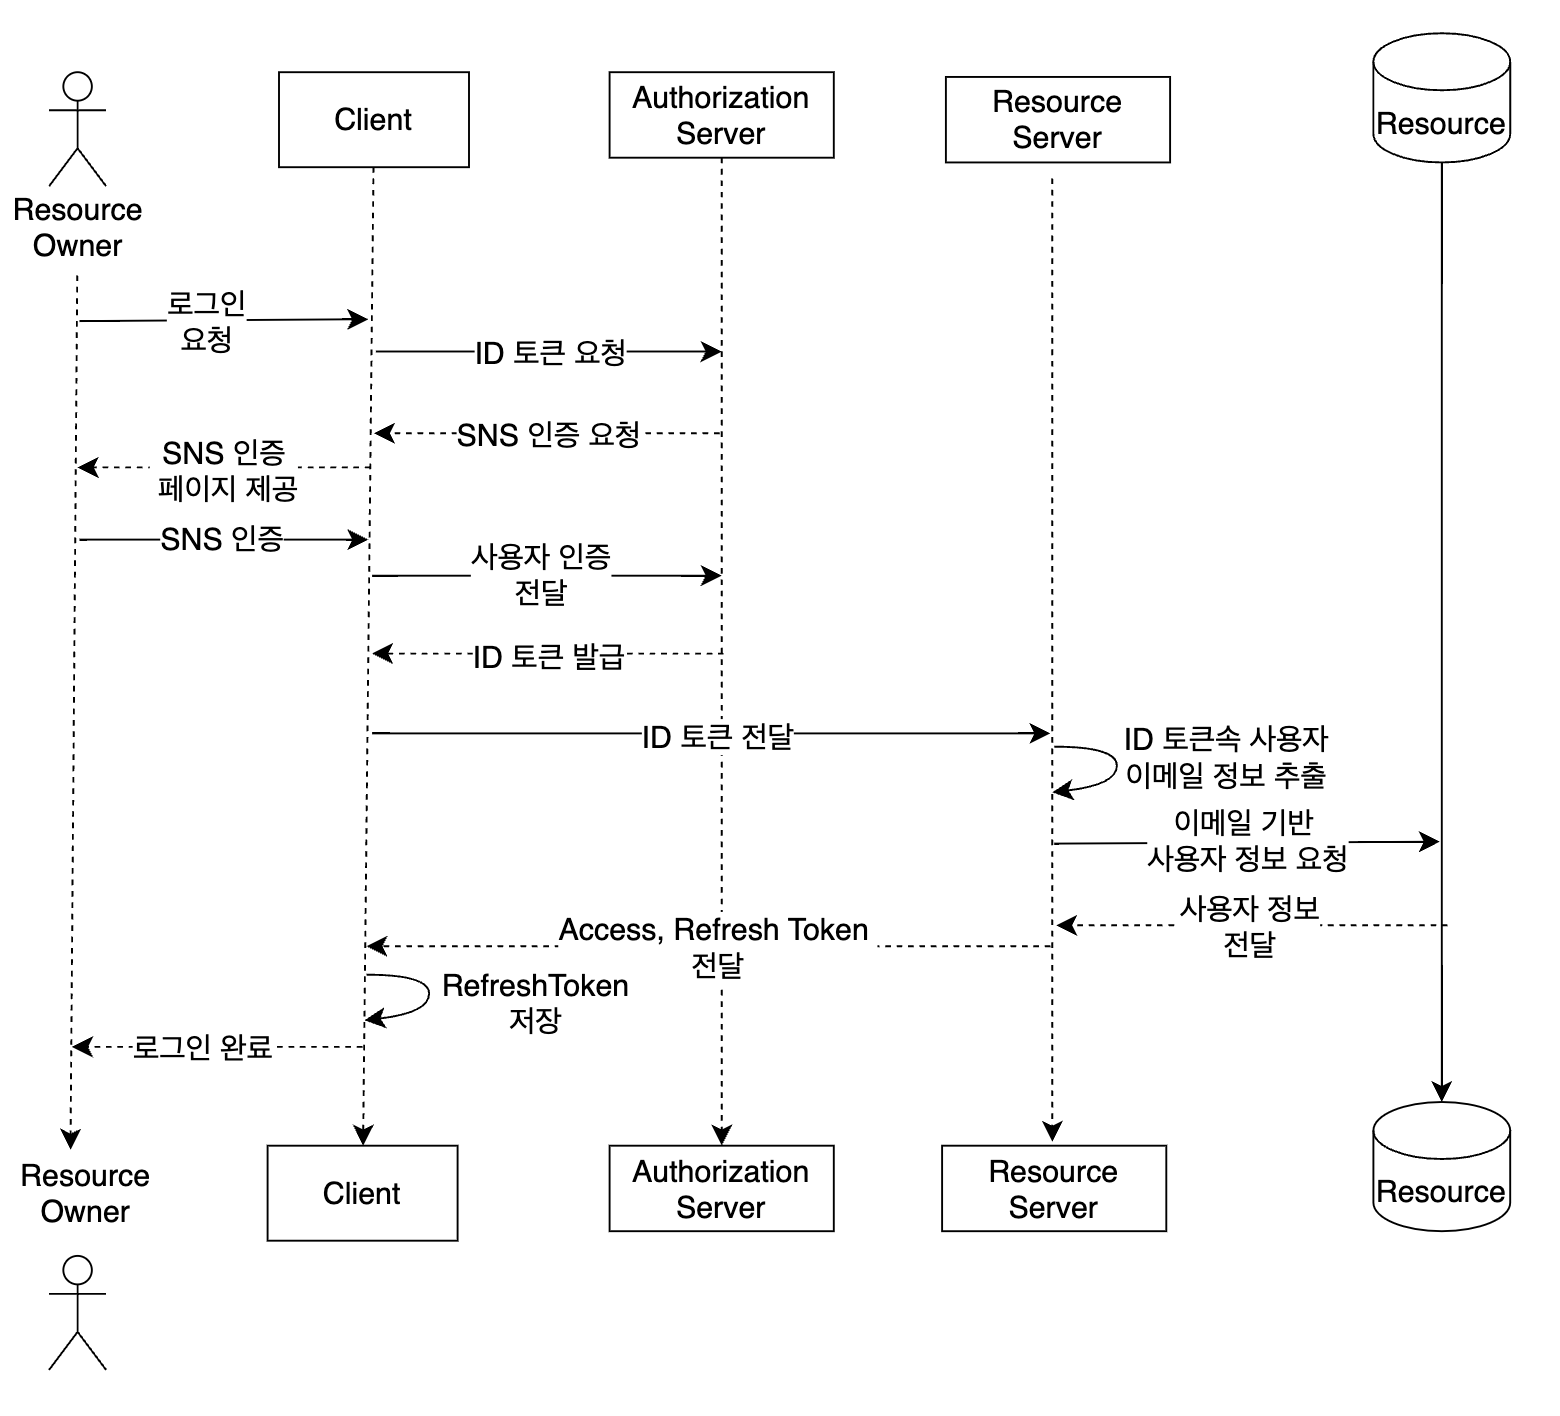
OIDC 란 사용자의 정보를 담은 token(google Id Token) 을 auth server에서 같이 발급을 하여
추가적인 네트워크 통신없이 사용자(resource owner)의 정보를 가져 온다.
OAuth 2.0 시스템 다이어그램

출처 : https://min5k-619.tistory.com/40 -- 위 그림 7번 이후 사용자 정보를 획득하는 경우
"Id token 이 없는 OAuth 2.0 인 경우의 사용자 정보 획득."

출처: 네이버 웍스 & 구글 api docs 보고 직접 그림 MainActivity.kt
package com.example.myapplication

import android.content.Intent
import android.net.Uri
import androidx.appcompat.app.AppCompatActivity
import android.os.Bundle
import android.widget.Button
import android.widget.TextView
import android.util.Log

class MainActivity : AppCompatActivity() {

    private lateinit var authorizationText: TextView

    override fun onCreate(savedInstanceState: Bundle?) {
        super.onCreate(savedInstanceState)
        setContentView(R.layout.activity_main)

        val googleLoginButton = findViewById<Button>(R.id.googleLoginButton)
        authorizationText = findViewById(R.id.authorizationText)
        Log.d("AuthorizationLog","NOT")
        googleLoginButton.setOnClickListener {
            // 구글 로그인 페이지 열기
            val intent = Intent(Intent.ACTION_VIEW, Uri.parse("http://sunghyun98.com/oauth2/authorization/google"))
            startActivity(intent)
        }
    }

    override fun onNewIntent(intent: Intent?) {
        super.onNewIntent(intent)
        handleIntent(intent)
    }

    private fun handleIntent(intent: Intent?) {
        intent?.data?.let { uri ->
            if (uri.toString().startsWith("http://sunghyun98.com/")) {
                val authorization = uri.getQueryParameter("Authorization")

                // 콘솔에 Authorization 값을 출력
                Log.d("AuthorizationLog", "Authorization: $authorization")

                // 새로운 액티비티를 시작하고 Authorization 값을 전달합니다.
                val authorizationIntent = Intent(this, AuthorizationActivity::class.java).apply {
                    putExtra("Authorization", authorization)
                }
                //http://localhost:8080/oauth2/authorization/google
                startActivity(authorizationIntent)
            }
        }
    }

}
Authorization.kt
package com.example.myapplication

import androidx.appcompat.app.AppCompatActivity
import android.os.Bundle
import android.widget.TextView

class AuthorizationActivity : AppCompatActivity() {

    override fun onCreate(savedInstanceState: Bundle?) {
        super.onCreate(savedInstanceState)
        setContentView(R.layout.activity_authorization)

        val authorizationDisplayText = findViewById<TextView>(R.id.authorizationDisplayText)
        val authorization = intent.getStringExtra("Authorization")
        authorizationDisplayText.text = authorization ?: "No Authorization found"
    }
}
실행 하면 다음과 같은 구글 로그인 버튼이 보입니다.

로그인 페이지로 이동합니다.

이동한 페이지의 주소창에 JWT 토큰이 온것을 확인 할 수 있습니다.

/https://sunghyun98.com/?Authorization=eyJhbGciOiJIUzI1NiJ9.eyJzdWIiOiJqbzE4NzcxMkBnbWFpbC5jb20iLCJpYXQiOjE2OTc1OTU5NDQsImV4cCI6MTY5NzU5NjI0NH0.NwFCqUnpz52aLTgRVETgsq1SHktTKGEc2CM5FG9LGLU
구글 로그인 후 정상적으로 토큰이 url 로 반환되는것을 확인하였지만 문제가 있습니다.
구글로 로그인 한 후 사용자가 직접 화면을 수동으로 넘기는 것은 ux 상 정말 불편합니다.
문제를 해경하기 위해서는 모바일에서 구글 로그인을 구현하고
로그인 후 구글로 부터 반환 받은 토큰을 사용하여 로그인을 시도합니다.
여기서 두가지로 나뉩니다.
1.
안드로이드에서 구글 로그인을 하고 사용자의 정보를 가지는 토큰을 넘겨서 스프링부트에서 확인하는 방식.
2.
안드로이드에서 구글 인가 코드와 관련 정보를 넘기고 스프링 부트에서 구글로 부터 토큰을 요청하고 사용자의 정보를 가져오는 방식.
1. 안드로이드에서 직접 토큰을 받아오는 방식 "access token 이 아닌 id 토큰 입니다."
장점: 앱과 구글 간의 통신 횟수가 적어집니다. 빠른 응답 시간을 기대할 수 있습니다.단점: 앱이 토큰을 직접 가지고 있기 때문에, 앱 내 보안 이슈나 중간자 공격(man-in-the-middle)에 노출될 위험이 있습니다.(안전성 문제 ) , 토큰의 관리 및 갱신 로직을 클라이언트와 서버 양쪽에서 처리해야 할 수도 있습니다.
2. 스프링 부트에서 auth code 로 구글에서 토큰을 받아오는 방식
장점: 안전성: 실제 토큰은 백엔드에서만 처리되므로 클라이언트 측에서의 토큰 노출 위험이 줄어듭니다.
토큰의 관리 및 갱신 로직이 서버 측에서만 처리될 수 있어, 관리가 용이합니다.단점: 추가적인 서버 요청이 필요하여, 약간의 지연 시간이 발생할 수 있습니다.
서버의 부하를 줄이기 위하여 1 안으로 프로젝트시에 진행을 하며,
코드는 1안과 2안 모두 포함 하면 다음과 같습니다.
로그인을 할 컨트롤러
@RequestMapping("/login")
public class OAuth2ApiController {

    private final GoogleLoginService googleLoginService;
    private final JwtService jwtService;

    // mobile 과 web 에서 스프링에서 발급한 jwt 을 통한 회원 정보 호출
    @PostMapping("/oauth2/token")
    public ApiResponse<TokenLoginResponse> googleAuthenticationLogin(
            @RequestBody TokenLoginRequest request) {
        Member member = jwtService.findMemberByToken(request.token());
        return ApiResponse.success(jwtService.getTokenLoginResponseByMember(member));
    }

    // 웹 에서 구글 ID 토큰을 통한 회원 정보 호출  :  회원 이메일 타입, jwt
    @PostMapping("/web/oauth2/google/idToken")
    public ApiResponse<TokenLoginResponse> webGoogleAuthenticationLogin(
            @RequestBody TokenLoginRequest request) {
        Member member = googleLoginService.loginGoogleOAuthWithWebIdToken(request.token());
        return ApiResponse.success(jwtService.getTokenLoginResponseByMember(member));
    }

    // mobile 에서 구글 ID 토큰을 통한 회원 정보 호출  :  회원 이메일 타입, jwt
    @PostMapping("/mobile/oauth2/google")
    public ApiResponse<TokenLoginResponse> mobileGoogleAuthenticationLogin(
            @RequestBody TokenLoginRequest request) {
        Member member = googleLoginService.loginGoogleOAuthWithMobileIdToken(request.token());
        return ApiResponse.success(jwtService.getTokenLoginResponseByMember(member));
    }

    // Spring , React 에서 IO 토큰 발급을 위한 Enrty Point , 접속시 구글 로그인 창으로 이동
    // http://localhost:8080/login/web/oauth2/google

    @GetMapping("/web/oauth2/google")
    public ResponseEntity<Void> redirectToGoogleLogin() {
        String googleLoginUrl = googleLoginService.redirectToGoogleLogin();
        return ResponseEntity.status(HttpStatus.FOUND).location(URI.create(googleLoginUrl)).build();
    }

    // 구글 로그인 이후 ID 토큰을 발급받는  redirection url
    @GetMapping("/web/oauth2/code/google")
    public ResponseEntity<String> handleGoogleLoginCallback(
            @RequestParam String code,
            @RequestParam String state) throws IOException {
        String token = googleLoginService.getIdTokenFromGoogle(code);

//        String token = googleLoginService.getAccessTokenFromGoogle(code);
        return ResponseEntity.ok(token);
    }

}
구글 로그인을 위한 클라이언트 등록은 웹과 모바일이 나눠져있어 유저케이스 마다 다르게 설정 해줘야합니다.
처리 할 서비스
package travelfeeldog.infra.oauth2.service;

..

@Service
public class GoogleLoginService {

    private final String mobileClientId;
    private GoogleIdTokenVerifier verifier;
    private final MemberWriteService memberWrite;
    private final String webClientId;
    private final String webClientSecret;
    private final String redirectWebUrl;
    private static final List<String> SCOPES = Arrays.asList(
            "https://www.googleapis.com/auth/userinfo.email",
            "https://www.googleapis.com/auth/userinfo.profile"
    );

    @Autowired
    public GoogleLoginService(
            @Value("${spring.security.oauth2.client.registration.google-mobile.client-id}") String mobileClientId,
            @Value("${spring.security.oauth2.client.registration.google-web-react.client-id}") String webClientId,
            @Value("${spring.security.oauth2.client.registration.google-web-react.client-secret}") String webClientSecret,
            @Value("${spring.security.oauth2.client.registration.google-web-react.redirect-uri}") String redirectWebUrl,
            MemberWriteService memberWrite) {
        this.mobileClientId = mobileClientId;
        this.webClientId = webClientId;
        this.webClientSecret = webClientSecret;
        this.memberWrite = memberWrite;
        this.redirectWebUrl = redirectWebUrl;
    }

    public Member loginGoogleOAuthWithMobileIdToken(String idToken) {
        setVerifier(this.mobileClientId);
        return saveMemberByAttributes(idToken);
    }

    public Member loginGoogleOAuthWithWebIdToken(String idToken) {
        setVerifier(this.webClientId);
        return saveMemberByAttributes(idToken);
    }

    private void setVerifier(String clientId) {
        this.verifier = new GoogleIdTokenVerifier.Builder(new NetHttpTransport(), new JacksonFactory())
                .setAudience(Collections.singletonList(clientId))
                .build();
    }

    private Member saveMemberByAttributes(String idToken) {
        OAuthAttributes attributes = verifyGoogleIDToken(idToken);
        return memberWrite.saveByAttributes(attributes);
    }

    public OAuthAttributes verifyGoogleIDToken(String idToken) {
        GoogleIdToken idTokenObj;
        try {
            idTokenObj = verifier.verify(idToken);
        } catch (GeneralSecurityException | IOException e) {
            throw new IllegalArgumentException("Wrong In verify IdToken", e);
        }
        Payload payload = idTokenObj.getPayload();
        OAuthAttributes attributes = OAuthAttributes.ofGoogle("sub", payload);
        if (attributes == null) {
            throw new IllegalArgumentException("Wrong In IdToken payload");
        }
        return attributes;
    }

    public String redirectToGoogleLogin() {
        return buildGoogleAuthorizationCodeFlow()
                .newAuthorizationUrl()
                .setRedirectUri(this.redirectWebUrl)
                .setState("state_parameter_passthrough_value")
                .build();
    }

    public String getIdTokenFromGoogle(String code) throws IOException {
        return getTokenResponseFromGoogle(code).getIdToken();
    }

    public String getAccessTokenFromGoogle(String code) throws IOException {
        return getTokenResponseFromGoogle(code).getAccessToken();
    }

    private GoogleTokenResponse getTokenResponseFromGoogle(String code) throws IOException {
        return buildGoogleAuthorizationCodeFlow()
                .newTokenRequest(code)
                .setRedirectUri(redirectWebUrl)
                .execute();
    }

    private GoogleAuthorizationCodeFlow buildGoogleAuthorizationCodeFlow() {
        return new GoogleAuthorizationCodeFlow.Builder(
                new NetHttpTransport(), JacksonFactory.getDefaultInstance(),
                webClientId, webClientSecret, SCOPES)
                .setAccessType("offline")
                .setApprovalPrompt("force")
                .build();
    }
}
SPRING -Boot web , login -> JWT token (short) -> accessCheck -> rtk, atk
Android login -> ID_token -> SpringBoot <-> JWT token rtk,atk
web 과 앱을 동시 지원하기 위하여 두개의 client-id 를 받은 후 다음과 같이 설정합니다.
spring:
  security:
    oauth2:
      client:
        registration:
          google-web-test:
            provider: google
            redirect-uri: ${Google_Client_REDIRECT_URI}
            client-id: ${Google_WEB_Client_Id}
            client-secret: ${Google_Client_Secret}
            scope:
              - email
              - profile
          google-mobile:
            provider: google
            redirect-uri: ${Google_Client_REDIRECT_URI}
            client-id: ${Google_ANDROID_Client_Id}
            client-secret: ${Google_Client_Secret}
            scope:
              - email
              - profile
          google-web-react:
            provider: google
            redirect-uri: ${Google_Client_REDIRECT_URI_REACT_WEB}
            client-id: ${Google_WEB_Client_Id}
            client-secret: ${Google_Client_Secret}
            scope:
              - email
              - profile

# request login url : http://localhost:8080/login/web/oauth2/google-web-test
# success login url :  http://localhost:8080/login/web/oauth2/code/google

# request login url : http://localhost:8080/oauth2/authorization/google
# success login url :  http://localhost:8080/login/oauth2/code/google
테스트용 로그인 페이지의 버튼 주소도 변경합니다.
<div class="login-container mt-5"> <!-- 여기에 mt-5 클래스 추가 -->
  <h1 class="text-center">SpringBoot Login</h1>
  <div class="col-md-12 text-center">
    <div class="row justify-content-center">
      <div class="col-md-6">
        {{#userName}}
          <p>Logged in as: <span id="user">{{userName}}</span></p>
          <p>Role: <span id="role">{{userRole}}</span></p>
          <a href="/logout" class="btn btn-info active" role="button">Logout</a>
        {{/userName}}
        {{^userName}}
          <a href="/oauth2/authorization/google-web-test" class="btn btn-success active" role="button">Google Login</a>
        {{/userName}}
      </div>
    </div>
    <br>
  </div>
</div>
결과
1. ID 토큰 발급,인증을 테스트 하는 경우
접속 : /login/web/oauth2/google
redirection 페이지에서 ID 토큰 발급을 ResponseBody 로 확인
(프로젝트시 react 웹을 배포한 이후 설정 값들만 바꿔주면 됩니다 !)

id 토큰이 발급되었습니다. ID 토큰을 통한 스프링 JWT, 회원 정보 교환

포스트맨을 사용하여 확인한 결과 jwt 와 사용자 정보를 반환합니다. 2. 기존 SpringBoot 내장 웹을 통한 로그인
접속 : /oauth2/authorization/google-web-test

localhost:8080 접속 주소창에 Spring 이 발급한 JWT 확인

JWT 를 이용하여 로그인

jwt 로 로그인한 모습 3. 모바일인 경우
FireBase 로 부터 google-service.json 발급을 받습니다.
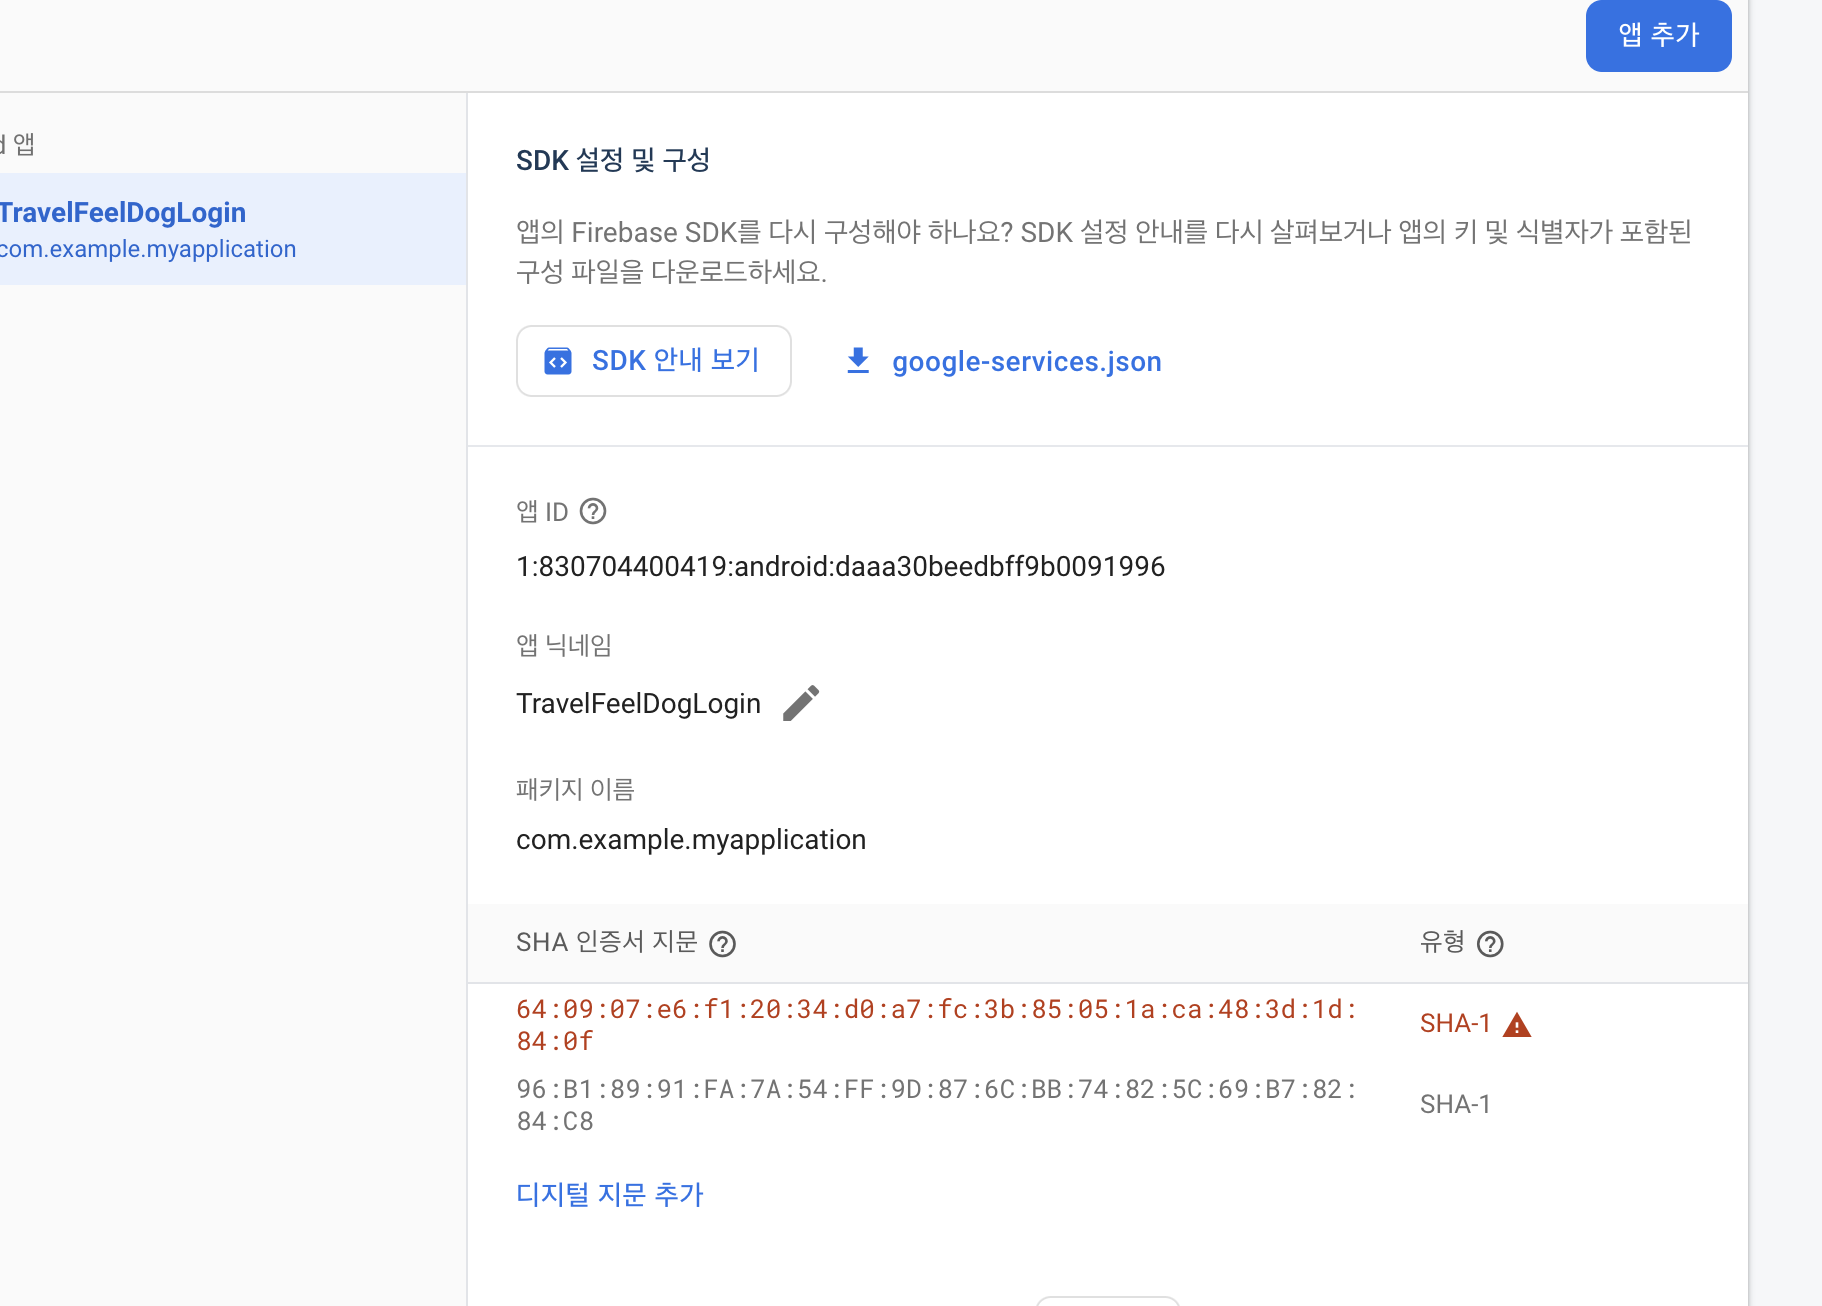
FireBase 에서 등록 ## local.properties 작성 sdk.dir=/Users/jo/Library/Android/sdk API_URL=https://sunghyun98.com GOOGLE_CLIENT_ID= 안드로이드 전용 클라이언트 id가 아니여도 됩니다.다음과 같은 위치에 둡니다.

결과

메인 페이지 
Login 창 
안드로이드 코드 :
https://github.com/HUFS-Capstone-23-01/TravelFeelDogLogin-Front
GitHub - HUFS-Capstone-23-01/TravelFeelDogLogin-Front: Login Page
Login Page. Contribute to HUFS-Capstone-23-01/TravelFeelDogLogin-Front development by creating an account on GitHub.
github.com
스프링 부트 코드:
https://github.com/HUFS-Capstone-23-01/TravelFeelDog-Server
구글 공식 문서
https://developers.google.com/identity/protocols/oauth2/web-server?hl=ko
웹 서버 애플리케이션용 OAuth 2.0 사용 | Authorization | Google for Developers
이 페이지는 Cloud Translation API를 통해 번역되었습니다. Switch to English 의견 보내기 웹 서버 애플리케이션용 OAuth 2.0 사용 컬렉션을 사용해 정리하기 내 환경설정을 기준으로 콘텐츠를 저장하고 분
developers.google.com
'Project > TravelFeelDog' 카테고리의 다른 글
AWS 스왑 파일을 이용한 메모리 늘리기 (0) 2023.10.25 EC2 가비아 - 도메인 등록 + Nginx & CertBot (1) 2023.10.16 Spring Security OAuth2 ,JWT : 모바일/웹 연동 (1) (0) 2023.10.16 Firebase 에서 OAuth2 , JWT 전환기(4) : 예외처리 (0) 2023.10.14 Firebase 에서 OAuth2 , JWT 전환기(3) (1) 2023.10.14