스프링부트 GCS 연동 part2
Part 1 에서 Storage 생성과 Iam 서비스 계정을 만들었다.
https://chosunghyun18.tistory.com/72
스프링부트 GCS 연동 part1
서문: 스프링 부트와 gcs 연동에 관한 글이다. 관련 블로그를 찾아 따라할려고 했지만 , 서버를 로컬에서 돌리고 가상 인스턴스에 올리지 않는 가정에서 시작하여 차이가 있다. 1. gcs 가 발급을 하
chosunghyun18.tistory.com
Part2는 이미지 업로드 까지 해보자.
간단하게 구글 클라우드의 서비스 계정을 어플리케이션에 올리려는 방식을 할려고 했지만 , 클라우드에서 필요한 조건들을 만족하기 어렵기 때문에 ,github 에 특정 값을 제외하고 json 파일을 올리고 , vm(gcp instance) 서버에서 코드를 다운로드 받은 후 나머지를 채우는 방식으로 진행을 했다.
1. 코드를 전부 작성, gcp-account-file.json 의 일부 키값을 제외하고 깃 허브에 업로드
2. GCP VM 에서 깃 클론 또는 pull
3. gcp-account-file.json 의 원본을 로컬 작업 환경에 추가하고 git.ignore 에 gcp-account-file.json 을 추가한다.
4. git rm -r --cached gcp-account-file.json 을 사용하여 깃이 추적을 하지 않게 한다.
5. GCP VM 에서 git rm -r --cached gcp-account-file.json 을 사용하여 깃이 추적을 하지 않게 한다.
6. 이후 git pull 을 하여도 gcp-account-file.json 의 변동이 없다.
코드원본은 이 블로그에서 가져왔다 (문제가 많다.)
:https://medium.com/@raviyasas/spring-boot-file-upload-with-google-cloud-storage-5445ed91f5bc
Spring Boot file upload with Google Cloud Storage
In this article, I will create a simple and fresh Spring Boot service with API for file upload using Google Cloud Storage. I am pointing…
medium.com
+ 코드의 원본이다 양심적으로 스타 하나 눌러 주자.
https://github.com/raviyasas/springboot-gcs-demo
그래도 복잡할 수 있으니 작업한 깃허브를 같이 올려 주겠다 . src>main>infra 를 보면된다
- > 2023 년 1월 25일에 확인한 동작하는 코드이다.
-> 만약 안된다면 코드는 잘못이 없으니 본인이,,읍
https://github.com/Team-Greendar/GreendarServer
GitHub - Team-Greendar/GreendarServer: Greendar Server Repository
Greendar Server Repository. Contribute to Team-Greendar/GreendarServer development by creating an account on GitHub.
github.com
코드에 같이 올리지 않은 설정 파일들이다 , resource 에 넣어 주고 수정을 해주자.
파일은 yml 2 개와 gcp-account-file.json 총 3개이며 , gcp-account-file.json 는 json 으로 받은 key 이다.
application.yml
server:
  port: 8080
spring:
  datasource:
    url: jdbc:mysql://127.0.0.1:3306/gexdb?serverTimezone=Asia/Seoul&characterEncoding=UTF-8
    username: rex
    password: ex
  servlet:
    multipart:
      max-file-size: 10MB
      max-request-size: 10MB

  jpa:
    hibernate:
#      ddl-auto: create
      ddl-auto: update
    properties:
      hibernate:
        #show_sql: true
        format_sql: true
        default_batch_fetch_size: 500
        #dialect: org.hibernate.spatial.dialect.mysql.MySQL8SpatialDialect
    #database-platform: org.hibernate.spatial.dialect.mysql.MySQL8SpatialDialect
    database: mysql
    #open-in-view: false

  mvc:
    path match:
      matching-strategy: ant_path_matcher
  profiles:
    include:
      - gcp


logging:
  level:
    org.hibernate.SQL: debug
    org.hibernate.type: trace

#  mail:
#    host: smtp.gmail.com
#    port: 587
#    username: we.exampler@gmail.com
#    password: nsrkmrijbegtzeeq
#    properties:
#      mail:
#        debug: false
#        #        debug: false
#        smtp:
#          auth: true
#          starttls:
#            enable:  true


#springdoc:
#  api-docs:
#    groups:
#      enabled: true
#    path: /api-docs
#  swagger-ui:
#    path: /swagger-ui.html
#    display-request-duration: true
#    groups-order: desc
application-gcp.yml
gcp:
  config:
    file: gcp-account-file.json
  project:
    id: acquired-device-00000
  bucket:
    id: gexex_storage
gcp-account-file.json
{
  "type": "service_account",
  "project_id": "",
  "private_key_id": "",
  "private_key": "",
  "client_email": "",
  "client_id": "",
  "auth_uri": "https://accounts.google.com/o/oauth2/auth",
  "token_uri": "https://oauth2.googleapis.com/token",
  "auth_provider_x509_cert_url": "https://www.googleapis.com/oauth2/v1/certs",
  "client_x509_cert_url": "https://www.googleapis.com/robot/v1/metadata/x509/greexwxe%40acquired-device-375000.iam.gserviceaccount.com"
}
원본 코드는 스타를 안 눌렀어도 작성자가 작업한 코드는 별 하나 눌러 주자..(주세요)
+ gcp-account-file.json 의 값들은 혹시 모르니 공개 github 에는 노출 하지 말자.
----------------------------------------------------------------------------------------------------------------------
----------------------------------------------------------------------------------------------------------------------
원본 코드를 바로 이용하여
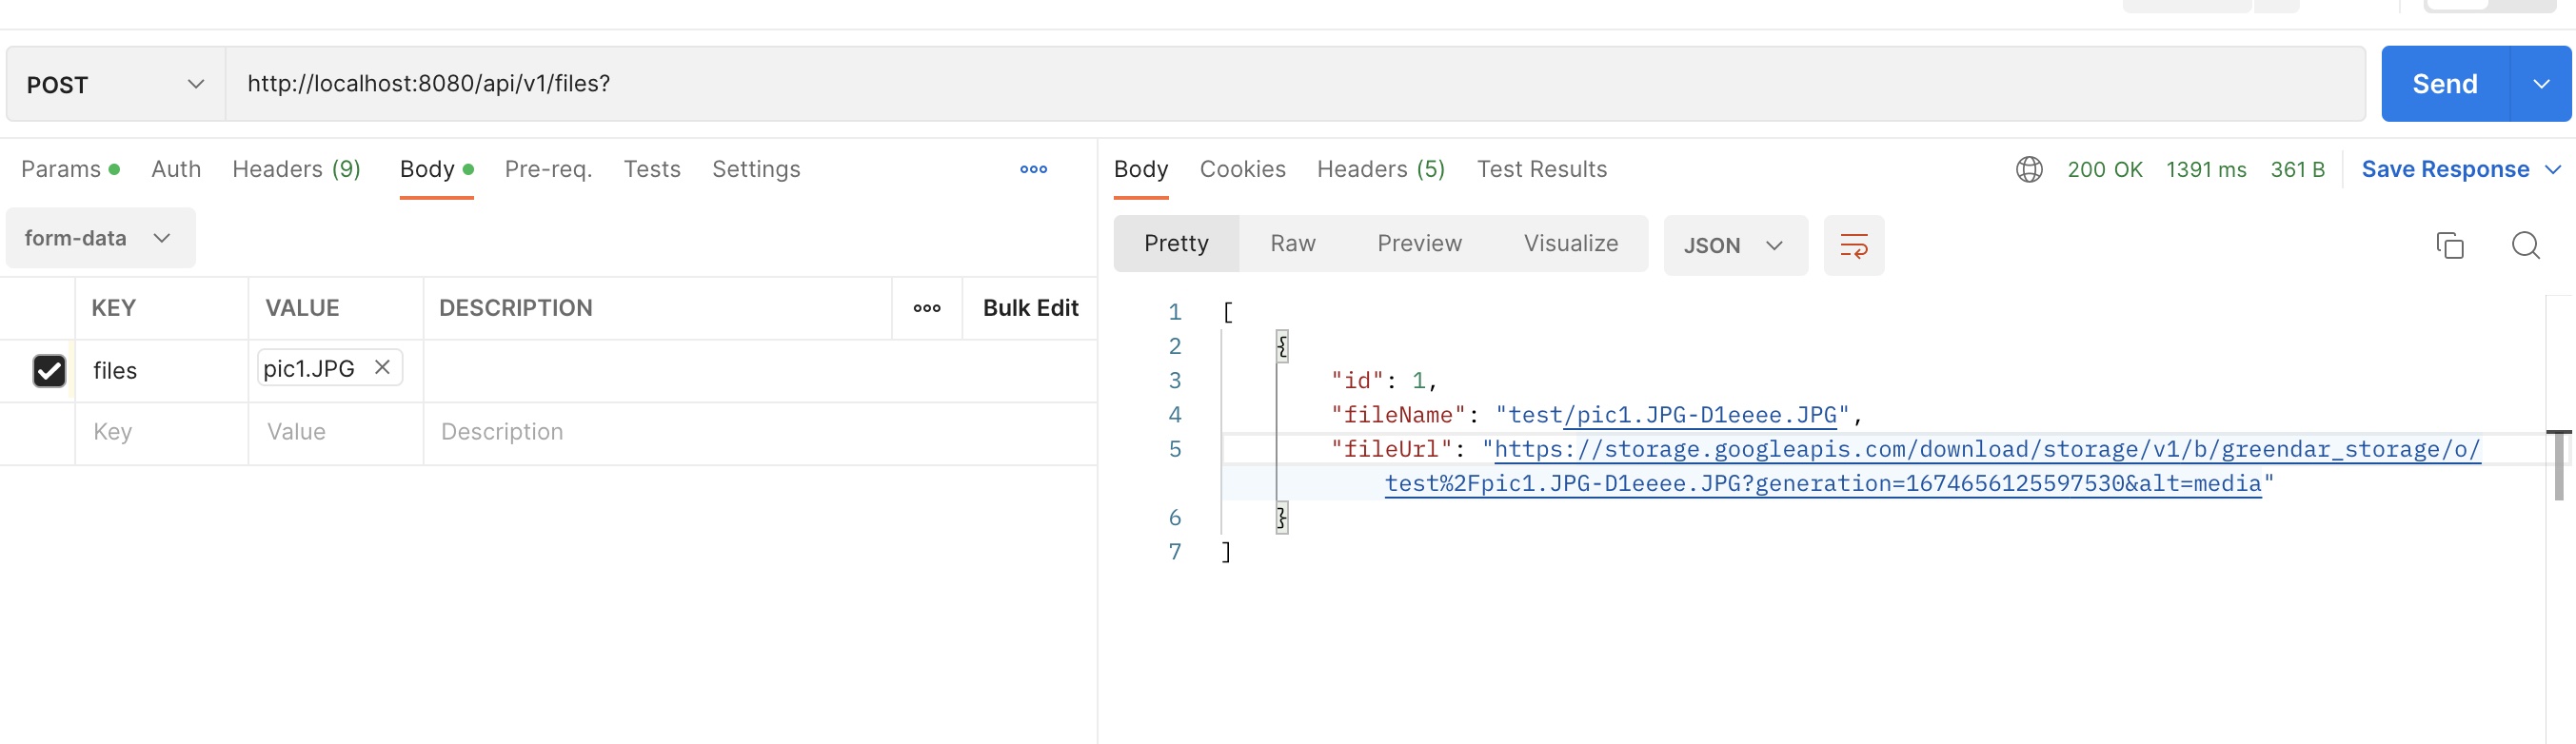
Method : post , multipart form data 로 쏴 주자!
> 그럼 바로 에러를 만난다. : Maximum upload size exceeded

- > spring boot의 파일 용량 설정값을 변경해주자
spring.servlet 을 추가해주자.
server:
  port: 8080
spring:
  datasource:
    url: jdbc:mysql://127.0.0.1:3306/exampleb?serverTimezone=Asia/Seoul&characterEncoding=UTF-8
    username:
    password:
  servlet:
    multipart:
      max-file-size: 10MB
      max-request-size: 10MB
만약 확장자가 문제가 있을 수 있으니, 본인의 코드에 맞춰 확장자를 추가해 주자!


File 은 정해진 확장자로만 가능하며
- 복수의 파일을 선택해서 올릴 수 가있으며
- 같은 파일의 이름을 올릴 수 가 있다.
+ 외부의 다른 사람이 개체의 url 의 접근 하도록 설정을 추가한다.
균등한 access 로 만들어서 모든 url 의 접근이 가능하게 추가를 할 수 밖에 없다.
추가를 할 떄 주 구성원에 "allUsers" 그대로 입력하자.
역할은 오직 "저장소 개체 뷰어" 하나만.

+
원본 코드는 사용하면 중복 파일을 프로젝트 파일에 만드니 수정을 해준다.
수정의 일부이니, 이글의 작성자의 깃허브를 참고 하자.
//            byte[] fileData = Files.readAllBytes(convertFile(multipartFile).toPath());
            byte [] fileData=multipartFile.getBytes();
추가로 storage 내부의 폴더도 경로에 맞게 추가하는 코드를 추가해 줄 수 도 있다. -> 공식문서를 참고하자.